


HOVERAir AQUA Repair Kit: A Step-by-Step Guide
The intuitive design of the HOVERAir AQUA makes the repair process incredibly straightforward, allowing you to handle minor hardware maintenance right at home. This blog provides a clear, step-by-step guide on how to use the official Repair Kit to replace your propellers, motor guards, and the main protective frame.
Watch the full tutorial video below to see the process in action, or scroll down for our detailed, step-by-step written guide.
What's Inside the AQUA Repair Kit?
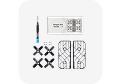
Opening the official AQUA Repair Kit box provides you with the specific parts and tools required for straightforward hardware maintenance. The complete package includes:
- Propellers: Fresh blades to swap out any chipped or warped units.
- Replacement frame: A full structural replacement to restore the exterior of your camera.
- Motor guards: Protective covers designed to shield the internal mechanics from impact.
- Screwdriver and screws: The precise tool and extra mounting hardware needed to fasten everything securely.

How to Replace Your AQUA Components
Following the designated procedures ensures the flying camera remains perfectly balanced and fully operational for its next flight.
Replace the Propellers
- Power off the device. Always verify that the flying camera is completely shut down before beginning maintenance. Lay the unit upside down on a flat, stable surface.
- Remove the old blades. Take the provided screwdriver and loosen the hardware by turning it counterclockwise. Once the screw is free, lift the worn propeller off the motor shaft.
- Match the rotation direction. Selecting the appropriate replacement is a critical detail. You must choose a new propeller designated for that exact position, ensuring its rotation direction perfectly mirrors the original blade.
- Secure and test the installation. Fasten the new screw clockwise to lock the piece down. Afterward, flick the propeller gently with your finger to confirm it spins smoothly and without any noticeable friction.
Swap Out the Motor Guards
- Position the camera. Rest the AQUA right side up on a sturdy desk or stable table.
- Detach the damaged guard. Grip the old motor guard firmly and pull it straight upward to cleanly detach it from the main body.
- Snap the new guard into place. Retrieve a fresh cover from your kit and line it up with the original mounting points. Press downward evenly on the plastic until you hear a sharp click, which indicates the part is locked securely into position.
Install the New Protective Frame
- Invert the drone. Flip the unit over so it rests upside down on your workspace once more.
- Unfasten the old frame. Locate the four screws holding the damaged exterior to the central chassis. Unscrew them completely, set them aside safely, and lift the broken frame away.
- Mount the replacement. Settle the new frame precisely into the original footprint. Reinsert the four screws and tighten them firmly, guaranteeing the new structure is entirely stable and safe for your next flight.
Post-Maintenance Safety Checks and Storage
Completing the physical component swaps requires a mandatory final review before you power the device back on. Double-check every single screw you handled during the repair process. Confirming that all fasteners are tightened securely prevents unexpected part detachments mid-air and strictly guarantees a safe flight environment. A quick physical inspection, such as gently shaking the unit to confirm nothing rattles, ensures the overall structural integrity remains perfectly solid.Once you verify the drone is fully flight-ready, gather all the remaining spare parts. Place the extra propellers, leftover screws, and the custom screwdriver directly back into the original box. Storing these items properly keeps your gear organized and ensures these specific tools remain easily accessible, leaving you perfectly prepared for any future hardware maintenance.
Keep Your AQUA Ready for Flight!
Routine maintenance directly extends the lifespan of your flying camera and ensures reliable performance during your outdoor excursions. Keeping the official Repair Kit on hand allows you to quickly address minor wear and tear without interrupting your travel plans. Equip yourself with the proper replacement parts today, so your drone always remains in optimal condition to capture smooth, high-quality aerial footage.


